Monday 25 June 2012

Chocolate Crispy Cakes


Sometimes I just fancy making something sweet but with a rather nasty cold lurking I really didn’t have the energy to make anything that involved beating or baking. These quick childhood treats still bring a smile to my face, and with little to no cooking involved they are really good to make with the kids. Using dark chocolate puts a more sophisticated (if you can call it that) edge on them and the golden syrup gives them a lovely gooey-ness. This recipe makes about 14 'cakes'

Ingredients


100g chocolate
50g butter
3 very big dollops (tablespoons?) golden syrup
120g (approx a third of a box) puffed rice


Melt the chocolate in a bowl. I usually do this over a pan of boiling water, but it can be done in the microwave on medium power under very close watch. Burnt chocolate does not a happy camper make.


Take off heat and add the butter (cut into cubes), stir until its melted.


Add the rice and mix to ensure each grain is covered in the chocolatey mixture.


Spoon into fairy cake cases and cool in the fridge, resist eating them half cooled!

Pancetta wrapped halloumi


As a first time gardener I’m very excited to see how my garden is currently blooming. I’m growing alpine strawberries which are just starting to ripen, I’m so excited to taste them! 


They remind me of Grammy and Gramps’ garden, they’d send me outside with washed out old plastic fruit pots* to collect hundreds of these tiny red morsels of delight. No need for sugar or cream, Grammy and I would gobble up handfuls of them and they’d be gone in minutes. But back to today’s recipe, other than strawberries my herbs in are going crazy and I have so much sage I just don’t know what to do with it. 


Well, here was one idea I had (that I think went quite marvellously) and I’ll be serving it up as a starter at my next dinner party.

Ingredients


250g Halloumi Cheese (1 pack)
100g pancetta (6/7 slices)
Sage Leaves

Slice the halloumi 1cm thick.Lay a sage leaf on each slice and then wrap with the pancetta (1 slice should just do a piece of halloumi).


Heat a heavy based pan and place the parcels in. Cook on one side until the pancetta is golden and crispy, then turn and do the same on the other. The halloumi should be slightly soft in the middle.

The third piece unwrapped itself as I only had half a slice of pancetta left


*I’ve never known anybody to be as economical as Grammy and Gramps. Notes, doodles and lists were written on the back of envelopes, no margarine tub was thrown away and if you’ll believe it she’d wash out clingfilm and dry it on a mini line in the kitchen. I think she’d be really happy to see the growing eco-friendly trends now. 

One such doodle by Gramps

Wednesday 20 June 2012

Home made Burger Buns


These buns are so easy and the egg glaze before they go in the oven gives a really lovely crunch to the crust.

Ingredients


500g Very Strong White Flour
1 sachet fast action dried yeast
1 teaspoon of salt
1 tablespoon of sugar
Approx. 300 ml warm water (2 parts cold to one part boiling)
1 egg


Put all the dry ingredients in a bowl (make sure the salt and yeast don’t directly touch) and mix thoroughly. Make a well in the bowl and slowly pour in the water mixing the flour in with a fork. As it starts to come together use your hands to make a ball, you don’t always have to use all that water. 


Lightly flour a surface and start kneading. Don’t be tempted to overflour the surface, the dough will get less and less sticky the more you knead. Carry on for about ten minutes, you’ll notice how the dough starts to get more elastic and bready.Lightly oil and cover with teatowels, leave in a warm place to rise to double its size, this will take about 45 mins to an hour.
Before

Once doubled, ‘knock back’ the dough (give it a good punch and get the air out) and knead for a few minutes. Divide into 8 and shape into balls, cover and leave again in a warm place until they have risen, about 30 minutes to an hour. If using a baking stone, preheat at 230 C.  

After 2nd Rising

Once risen, mix the egg up with a fork and glaze the buns. Place directly on baking stone (or just on a tray) and cook at 210 for 15 minutes (or until hollow sounding when tapped). 


Marinated Lamb Kebabs


There are few things as gratifying as waking up to a beautifully sunny day, particularly when it has rained continually for the past month. So what could be better? Waking up to sunshine two days in a row of course, and with the sun comes a whole new world of food possibilities. No longer does my body crave the comfort of a steaming plate of food, instead I want light lunches and finger food. Picnics, barbecues, anything which involves little effort and allows you to enjoy the sun as much as possibility gets a big tick in my book.

Kebabs in this country have a pretty bad name, they are associated with indistinguishable slithers of meat covered in some kind of sauce and some shredded salad, usually accompanied by a hangover the next day and kebab breath for far too long. It’s a shame really because (although I may have partaken occasionally in this drunken affair) they are one of my favourite things, so easy and surprisingly healthy!

I used a mix of cuts as that was what I had available (1 steak and 2 small pieces of neck fillet) and made 6 kebabs.

Ingredients

Approx. 300g boneless lamb
2 cloves
2 cloves of garlic (peeled and chopped)
1-2 teaspoon smoked paprika
1 teaspoon coriander seeds
1 teaspoon cumin (just under)
½ teaspoon chilli flakes
Salt and pepper
Extra Virgin Olive oil


Bash up the coriander seeds, cumin (if seeds), chilli flakes, salt (I’d use sea salt), pepper and garlic in a pestle and mortar.  Add the paprika and cumin, if not seeds, and mix well. Add the oil and the cloves (whole).

Dice the lamb into chunks about 2cm square and rub the marinade all over. Leave to marinade for at least 20 minutes (but the longer the better).


Cut the red onions into 8 pieces (half, half and half again). Thread the lamb onto skewers alternately with the red onion and cherry tomatoes. 


Grill on each side (either on the barbecue or under the grill) for approx. 2 minutes for pink lamb, longer for well done. Leave to rest for 5 minutes (if you can resist) and then tuck in. 


Tuesday 19 June 2012

Barbecued Hung Shao Pork Belly


The sun was out today for what feels like the first day ever which means only one thing in my household, a barbecue! Now, I do enjoy a good sausage or burger (particularly when in my home-made buns) but I think the barbecue is a rather underestimated cooking method, the smoky flavour it gives to meat cannot be replicated and I personally quite enjoy a bit of charring. I’d picked up a piece of Pork belly yesterday and after a recent bad experience, was determined to make it delicious.

I'm not very easy to take out for meals, I tend to feel rather resentful if I end up eating something I could have cooked better myself (and for half the price) and I’m perhaps just a little picky about the way food is on my plate. This was rather apparent when I was out for lunch recently in the New Forest. I saw pork belly on the menu and decided to give myself a treat. Well, this wasn’t the best of my ideas. It can’t have been slowly cooked because there was more fat on my plate than meat (and don’t get me started on the rather disgusting looking apple sauce smeared all over it). Please don’t get me wrong, I am well aware that pork belly is a very fatty meat, but when cooked well that fat just melts away and leaves the meat juicy and succulent with a crispy crackling.  This was my aim today, and I must say, the barbecue didn't disappoint. Marinated for hours then cooked in the oven on low before finishing off on the barbecue, this meat was mouth-wateringly tender and went down an absolute treat.

Ingredients


800g-1kg pork belly, skin scored
8 tablespoons dark soy sauce
8 tablespoons shaosang rice wine
4 tablespoons honey
2 tablespoons fish sauce
2 sticks of cinnamon
2 star anise

Mix all the marinade ingredients together except the honey. I use my dad's honey (he's a bee keeper) and as its from last year it has now set, so I put it in the microwave for about 20 seconds on low to get it a bit runnier. Put pork in a baking tray skin side up (the skin should be scored, your butcher should be happy to do this otherwise score into the fat without going through to the meat) and pour over boiling hot water (apparently this makes the cracking crispier).  Pour over marinade and then the honey, making sure it really goes into the holes in the fat. Leave for at least 2 hours or overnight in the fridge.

After marinating, put the pork in the oven on 60 for at least 2 hours (3 is even better). Light up the barbecue and once it all the coals have turned white and it has been going for a while (so the heat isn’t so intense) put the pork on the barbecue. Turn every 5-10 minutes, basting with the marinade each time for about 30 minutes until the crackling has gone crispy. Don’t worry too much if it flames a bit as the blackened bits are delicious, but if it does flame too much move away from direct heat.


Cut into chunks and serve with fresh (or even better, homemade) bread and a fresh green salad. 

Monday 18 June 2012

Spicy Prawn, Pancetta and Courgette pasta sauce


Living with an Italian it was only a matter of time until I got round to talking about pasta. I tend to go through phases with food and if the past 9 months need to be categorised, it would be under my Italian phase. I think it’s the simplicity of the food that I like so much, appreciating good quality ingredients and cooking them so as to enhance their natural goodness. I’m sure I’ll post one day about the wonders of a fresh tomato sauce, but this one is my favourite and involves such little preparation. Its an adaptation of a classic Italian sauce, amatriciana. I'd go with your gut on the amount of chilli, I can never seem to tell exactly how spicy it will turn out but if you don't like spicy food leave out the fresh chilli, the cayenne pepper will give enough of a warmth to the dish. The courgette ribbons in this make it really special, they are almost like having another kind of pasta on the plate.

Ingredients


1 medium white onion
150g raw king prawns*
70-100g pancetta (smoky bacon or lardons will work instead if you can't get pancetta)
1 Courgette 
250g tomatoes
1 clove garlic
½ teaspoon of cayenne pepper
1 chilli, de-seeded (or to taste)
½ teaspoon dried oregano (or a few sprigs of fresh oregano if you have it) 
Olive Oil (Extra Virgin if you can afford to cook with it!)


Chop the tomatoes into small chunks, I tend to use cherry tomatoes and cut them in a mix of quarters and halves. Dice the onion and chop the garlic and chilli very finely (I use my mini chopper for these). Wash the courgette and using a peeler peel thin, long ribbons of courgette. You may not need a whole courgette, see what it looks like as you add it to the pan later. 

If you have pancetta slices, chop these into small pieces (approx. 1 cm strips) Heat a small amount of olive oil in a pan on high heat, once hot add the pancetta. Keep it moving so it goes crispy without burning. 


Once crispy remove with a slotted spoon and drain on kitchen roll.

Remove the pan from the heat to let it cool slightly and turn the gas down to low. Once slightly cooler add the onions and garlic and cook until turning golden and translucent, making sure nothing browns or burns, then add the chilli. After a minute or two add the tomatoes and oregano and cook until they start to break down into a mush then put the pancetta back in. If it starts to go dry add a little water and taste for sweetness, fresh tomatoes can be a bit tart, add sugar if needed. 

If you haven’t got your pasta started by now, cover and get your pasta on for at least 3 minutes as the prawns and courgette will only take a few to cook. Once your pasta is half done add the courgettes and prawns and cook until the prawns turn pink.


I like to serve this with Bucatini, a few sprigs of fresh basil or parsley (if I have them in stock) and some grated parmesan. If you have leftovers it's even yummier the next day, but eat all the prawns the day you cook it, they don't reheat well.

*I de-veined my prawns, but this isn’t necessary and ever so fiddly.

Friday 15 June 2012

It's Pizza Time!


I tend to be rather compulsive with food and yesterday was just such an example. A couple of years ago I somehow acquired* Jamie Oliver’s Jamie’s Italy recipe book and yesterday afternoon I was sitting in my garden perusing it, enjoying the little bit of sun that was out and decided that I MUST have homemade pizza for dinner.

Now, I didn’t think this would be too much of a problem. I have all the stuff for bread making at home as it’s a new hobby of mine, I just needed some toppings and semolina flour. Oh…and a pizza stone. Every book, recipe, blog, article, person, chef (you get the picture?) says that cooking pizza without a baking stone will just be a disappointment. I’m not really up for disappointment in the kitchen, it rarely happens and it’s just such a waste of food, but a pizza stone seemed to a nonstarter. I called every shop in the area that I could reach before it closed but no, I googled how to make your own pizza stone and called every DIY store I could find, but I couldn’t even get hold of quarry tiles. I was getting to breaking point, questioning the advice and wondering if I should just do it straight on the oven shelf when I wondered…

Eureka! How to make a pizza stone at home without buying any new fangled toys…you just turn over a ceramic oven dish. Now, I’m still looking to invest in some quarry tiles/pizza stone but for now this has done nicely.

I think I have rambled on enough now so here it is…

Pizza Dough courtesy of Jamie Oliver


Ingredients


800g strong white bread flour
200g semolina flour
1 tablespoon of sea salt
2 x 7g sachets dried yeast (I used fast action)
1 tablespoon caster sugar
Approx. 650ml tepid water
Baking stone/quarry tiles/upside down ceramic oven dish

Pour the flours, salt and (if using fast action dried yeast) yeast and sugar onto a clean surface. If your yeast is just normal dry yeast then you’ll need to put the yeast and sugar in warm water and leave for a few minutes to froth. You must make sure the salt and yeast don’t directly meet at this point. Make a well in the centre of the flour and pour in some of the water. Using a fork start mixing the flour with the water to a dough. Keep adding the water until it all comes together to form a ball (you’ll need to do that bit with your hands).

Then comes the kneading. This is the crucial process in bread making and you really can’t skimp on it. At least 10 minutes is required and you’ll notice how much more stretchy and elastic the dough becomes. Once kneaded, flour the top, cover and leave to rest for 15 minutes (this is when I made my tomato sauce).


Divide the dough into as many pizzas as you want (I made 8 out of it, remember the size of the stone/dish you will be cooking it on, you don’t want the pizzas to be bigger) and roll out the dough. I found to get it thin enough I had to really stretch it with my hands after using a rolling pin. 


Stack up on oiled and floured foil or baking paper (I might have forgotten the flouring and oiling step…it made my life quite difficult by the end!) and they are ready for toppings.


Basic pizza sauce


This sauce is so easy and can be made whilst the pizzas are resting. This is enough to cover the dough and a bit.

Ingredients


Extra virgin olive oil
3-4 cloves of garlic
Fresh basil leaves
Fresh (or dried) oregano
2 tins (400g) good peeled plum tomatoes unfortunately I would have to say this is a time where basics tomatoes won’t really do.
Salt and pepper

Heat a saucepan and add a glug of olive oil and the garlic and cook until garlic is turning golden. Then add a small handful of basil leaves and some oregano (I used about half a teaspoon of dried oregano). Pour in the tomatoes, season with salt and pepper and leave to bubble and reduce on a medium heat. Stir occasionally to ensure its not sticking and mash up the tomatoes with your spoon. After about 20 minutes it will be ready but it will be happy bubbling away for some more time, especially if you add a little water (half fill one of the tomato cans with water and swoosh it around to get all the last bits of flavour out) when drying out.

Now comes the really exciting part. Top your pizza with whatever you want; here are some of my favourites.
 
My favourite pizza: Pancetta, buffalo mozzarella and rosemary

Tomato-less and tasty: garlic bread base with mixed mushrooms (I like oyster and shitake), ricotta cheese, thyme and Parma ham

The ‘Giulia’ : Cook a simple margarita pizza, once cooked top with parma ham and rocket
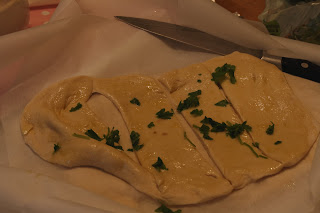
Garlic Bread


Ingredients


2 cloves of garlic (at least)
Extra virgin olive oil
Rosemary
Salt and pepper

Preheat the oven with your stone (or makeshift stone) inside to its hottest temperature.

Chop the garlic and then mash in a pestle and mortar. If you don’t have one of these chop very small and then use the back of a knife to mash into a paste. Pour olive oil into the paste and spread onto a rolled out piece of dough with your fingers (or, you know, a basting brush of sorts). Sprinkle on some rosemary (I know I used parsley here but its much nicer with rosemary),score some lines across and pull apart slightly (maybe slightly less than me!)


Place onto pizza stone and cook until golden and crispy.


* I say acquired because I am certain i never purchased said book, its as if it grew in my book collection!

Wednesday 13 June 2012

Paella


Please please please don’t shout at me for calling this dish Paella. 

I do not proclaim to for this to be of Spanish origin (though at least some of the ingredients are) and I am aware it is almost certainly not a traditional recipe. Having said that, Paella is the dish that has inspired this recipe, I use ‘paella’ rice and (if I had the resources to do so) would cook this in a paella pan. This recipe is very flexible and you can use almost anything you have in the fridge or cupboard to help it along (that’s what they’d do in Spain right?!) Although in this recipe I have used a red onion white is absolutely fine (and more traditional). In the past I have used asparagus instead of beans, and peas are the more traditional option, rabbit is often used instead of chicken (though I couldn’t do that to Lola…), red pepper is also normally used but I had a yellow one available…etc etc etc…

There may be techniques that you’ll need to know for this. Please refer to hints and tips page.

I fed 5 hungry people but had a silly amount of mussels, to feed 6-8 I’d add another pack of prawns and 50-150g more rice.

Ingredients

400g ‘paella’ rice
350g chicken thighs/drumsticks (or a jointed chicken, with skin and bones)
180g raw king prawns (mine were peeled but if you can get with shells on all the better)
1kg live mussels
1-2 litres of stock (I’m sorry but this does vary and is really up to judgement)
Chorizo ring (though sausages would work as well, just no slices)
70g pancetta
100g tomatoes
1 pepper
1 onion
75g fine beans
1-2 tablespoons of flour
1 teaspoon smoked paprika
½ teaspoon cayenne pepper (or to taste)
Olive oil
1-2 cloves garlic
2 pinches saffron
Flat leafed parsley
Salt and pepper

Everything needs to be ready to go once you start cooking so dice the pepper, garlic and onion. Chop the tomatoes, I used cherry tomatoes and chopped them in a mixture of halves and quarters. Wash the mussels in a clean sink of cold water, de-beard and discard any that are cracked or do not close when tapped sharply. Slice the chorizo quite thickly on the diagonal, about 1-2cm wide. Chop the tops and tails off your beans and cut them into thirds or quarters.  

Get the chicken thighs and cut them in half, bone and all. I find the best way to do this is to bring the knife down very hard on the middle of the bone, saw a bit and then crack it. That is unless you have a very sharp and heavy knife or meat cleaver. Dust the chicken with half a teaspoon of paprika and flour and mix around until all the chicken is coated.


Heat a glug of olive oil in the pan over medium hot heat (the Spanish take their olive oil seriously and it is a key ingredient in this dish so use the best you can afford) and when hot put the chicken in. Cook, turning occasionally, until golden brown on all sides and remove from the pan with a slotted spoon.

Throw (ok, maybe not!) the pancetta into the pan and fry until crispy, remove with a slotted spoon and place onto kitchen roll to soak up excess fat.

Boil the kettle and prepare a litre-1.5 litres of stock infusing it with half the saffron (that’s just posh speak for putting it in hot water, or stock in this case).

Chorizo goes into the pan next and fry for a few minutes until starting to brown on the edges, then turn the heat down to medium (or a bit lower until the pan cools slightly) and put the onions in the pan. Cook until the onions are turning translucent but not colouring and then add peppers, garlic, cayenne pepper, paprika, salt and pepper and cook before adding the chicken and tomatoes.


 Add some of the stock and bring to a low boil/simmering point (i.e. bring to the boil and then turn heat down so bubbles calm but don’t disappear). Cook for 5-10 minutes. Take the chicken out (again!) with a slotted spoon and then add the rice and half of the stock left. Bring it all to a boil and turn it down to simmering point and cook for ten minutes uncovered and only disturbing occasionally to check the rice isn’t burning. Add more stock if necessary in this time.

After ten minutes add more stock if drying up, put the chicken back in and put the lid on for 10 more minutes.

This is now a time for a judgement call. If you think your rice is nearly done (it has barely any more bite left in it) then add the prawns and the mussels, a bit more stock, turn the heat up and cook with the lid on for 4-6 minutes (until the prawns have turned pink and the mussels have opened). Shake it around during this time, it seems to encourage the mussels to open and also stops the rice from sticking. If the rice has quite a bit of bite left, add more stock if drying out and cook for another 5 minutes with the lid on, taste again and repeat if necessary, then add the shellfish.  

Traditionally served in its cooking dish I recommend putting the pan on the table, sprinkling over a bit of chopped parsley and the pancetta and letting everyone dig in!


Tuesday 12 June 2012

Stuffed and rolled lamb with spinach and gremolata


This was a bit of an experiment attempting to get that slow roasted lamb tenderness in much less time.I mixed a Greek slow roasted lamb recipe I know with a stuffed lamb and because I didn’t have white wine I used champagne instead, I think it turned out blooming marvellously! I tend to use whatever boneless piece of meat I  can get reduced in the and have thrown in the freezer, this one is a shoulder.

Gremolata is a mixture parsley, lemon zest and garlic. The lamb I used weighed 700g and I fed three people with it, though it could have easily fed four.

Ingredients

Small bunch parsley (about 15 sprigs)
2/3 cloves garlic
Zest of ¾ lemon
Boneless joint of lamb
130 g (half a bag) of spinach
White onion
Lemon
100ml chicken stock
½ glass champagne

Finely chop parsley and garlic (I find a mini chopper a lifesaver here!) and mix with lemon zest. Tada! You’ve made gremolata!

Preheat the oven to 180 (I have a fan oven, adjust accordingly)

Dice the onion and soften in a pan on medium heat. Keep stirring! You do not want the onion to brown and the slower it cooks the sweeter the flavour. Once its nearing translucency remove from pan.

Put the spinach in this pan and wilt, then squeeze in a colander or sieve to get rid of as much moisture as possible.

Chop up spinach and mix with the gremolata and onion (if my mini chopper is otherwise occupied I’ll use a pair of scissors in a smallish bowl to chop the herbs spinach and mix it all up).

Unroll lamb and spread a thin layer of the mix over it


Roll back up and secure with string of pre-soaked bamboo or wooden skewers (this stops them burning in the oven, use this technique for the barbecue too.)


Slice half a lemon into wedges and place in the baking tray with 100ml hot stock and half a glass of champagne (or white wine). Put in the oven for 15 minutes, then turn oven down to 140 and cover lamb with foil (baking paper will also work here, you just need to tuck it properly around). Cook for a further 40 minutes (adjust according to weight and as you can see from the picture, I like my lamb pink, for more well done I'd add up to 20 more minutes here) before turning the oven up for the last 10 minutes of cooking to 180. 

Allow lamb to rest (under foil/baking paper and lots of tea towels) for at least 10 minutes before carving. It will keep the heat and it makes such a difference to the amount of juice the meat retains.

Welcome


I think I need to start with a confession…

I am obsessed with food.

I don’t just like food, I love it. What to eat today is pretty much the first thing I think about in the morning and it just doesn't stop! When (if) I eat breakfast I’m thinking about what to have for lunch, at lunch I’m googling recipes and blogs and trawling through my trusted books for inspiration for how to make tonight’s dinner extra special. Cooking is the activity that I spend the majority of my time thinking about, shopping for and doing. I find it genuinely difficult to go to even my local shop and not spend at least a tenner, and if we’re talking about supermarkets you can easily triple that. So, I have finally decided to put this to some use at least and document my preoccupation.

Now, I’m not sure I’d call myself a foodie. Not I have anything against foodies, it’s just I’m not sure I fit into that category. Don’t get me wrong, I love food (as previously discussed), it’s just that I don’t really serve up haute cuisine. I use readily available ingredients and fairly simple techniques, I can’t always afford to buy organic and I do use cheats (shhh!) My training has mostly come from watching my mother and grandmothers in their kitchens and my recipes generally include a little bit of this and a little bit of that, really what I have to hand. Growing up in a Jewish household, food has always been central to family life. It is not uncommon for my mother to feed 30 odd people over a weekend and I have memories of waking up on a Friday craving chicken soup because she’d been up since 5 cooking it for Shabbat. This blog, my cooking and my want to share this love of food is all a tribute to them, and although feeding 20 at a time is still somewhat ambitious in my little kitchen, I’ll try to do them justice.

I hope you enjoy meandering through my food discoveries, successes and (hopefully not too many) failures.